In a nutshell
- 🔆 Light angle exposes streaks: clean in diffuse light, then inspect with grazing (cross‑light) to reveal hidden lines.
- 🧼 Technique beats chemistry: keep a squeegee at 30–45° lead, alternate pass directions, and finish with meticulous edge management.
- 🕒 Time and setup matter: choose overcast or shaded windows, work small sections in sun to maintain a wet edge, and move your body to change viewing angle.
- 🔦 Smart tools amplify results: use an LED at 15–30° for inspections and polarised lenses to differentiate glare from residue.
- 🪟 Real-world proof: on a Victorian bay and modern bi‑folds, light/angle adjustments cut visible streaks from 12 to 1—showing the power of angle, light, and timing.
Every home has that one pane that refuses to behave—no matter how diligently you wipe, shy streaks reveal themselves the moment the sun shifts. As a UK journalist who has followed professional window cleaners from Cornwall to Caithness, I’ve learned that the perfect angle isn’t just about your wrist; it’s also about the angle of light landing on the glass. When you change the way light strikes a window, you change what your eyes can see—and, crucially, what you might miss. Below, I unpack how subtle adjustments to both cleaning technique and illumination can banish streaks and deliver that coveted, camera-ready clarity.
Why Light Angle Reveals or Conceals Streaks
Most streaks hide in plain sight until grazing light hits them—think late afternoon sun sliding sideways across a pane. At shallow incidence angles, tiny ridges of detergent residue or mineral deposits throw strong specular reflections back at you. That’s why a window looks “perfect” at noon and shamefully lined at 4 p.m. Low, directional light is the most unforgiving inspector you’ll ever meet. Understanding this physics-lite truth reframes cleaning as not just a scrub-and-dry chore, but a game of controlled illumination.
For the homeowner, the winning move is to clean against the light, then inspect across it. Work while the window is evenly lit—overcast skies are ideal—so you’re not chasing evaporating streaks in hot glare. Then, before you down tools, step to one side and let a strong light rake the glass at a shallow angle. You’ll suddenly spot the faint, tell-tale arcs your frontal view missed. Adjusting your viewing position by as little as a metre can completely change what the pane confesses.
There’s also a psychological bonus: changing light angle reduces the “invisibility effect” that lulls you into believing you’re done. By building a habit of cross-light inspection, you replace guesswork with a repeatable check. That tiny ritual—step, tilt, scan—cuts callbacks for pros and saves weekend warriors hours of re-wiping.
The Science-Backed Cleaning Angle: Squeegee, Cloth, and Wrist
Even with perfect lighting, technique decides everything. Pros tend to keep the squeegee at a 30–45 degree lead angle to the direction of travel. That inclined edge creates a controlled, rolling bead of water that scoops contaminants off the glass rather than smearing them. The flatter the squeegee, the more you push water; the steeper it is, the more you slice it clean. Pair that with moderate, even pressure—too light leaves film; too heavy flexes the rubber unevenly.
On cloth work, microfiber wins because ultra-fine fibres physically trap particles. Fold the cloth into eighths and rotate to a fresh face for every final wipe, so you’re never re-depositing grime. Finish with a dedicated edge management pass along frames and gaskets; it’s where drips almost always start. When in doubt, alternate directions: vertical passes to remove, horizontal passes to confirm. Your eye instantly spots a stray line that crosses the grain.
Pros vs. Cons of common moves:
- 45-degree squeegee lead: Pro — clean sheeting; Con — needs practice on corners.
- Flat squeegee: Pro — fast for floods; Con — high smear risk.
- Circular cloth buff: Pro — blends micro-marks; Con — can create halos under low sun.
- Figure-8 pro pass: Pro — seamless edges; Con — tougher to master on small panes.
Small tweaks to angle and direction matter more than fancy liquids. A flawless finish is usually 80% technique, 20% chemistry.
Timing and Setup: Harness Daylight, LEDs, and Polarisation
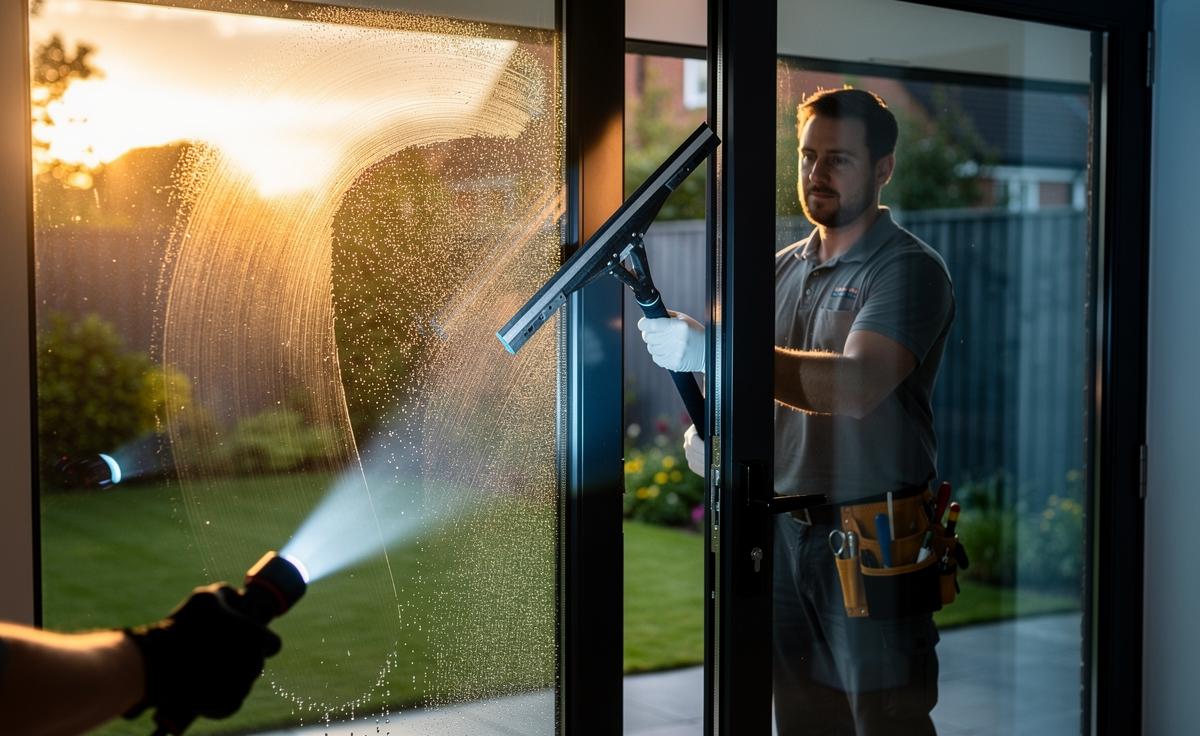
In Britain’s mercurial weather, timing is a secret weapon. Clean on overcast days or during morning shade when glass is cool; solutions evaporate predictably and streaks don’t “flash-dry” into permanent-looking ghosts. If you must clean in full sun, keep panes wet and work smaller sections to maintain a wet edge. For inspections, angle a bright LED torch at roughly 15–30 degrees to the glass; the raking beam exaggerates residue so you can buff precisely where it counts.
Polarisers can help too. Slip-on polarised sunglasses or a clip-on lens distinguishes glare from genuine grime by filtering certain reflections. It’s not a silver bullet, but on south-facing bi-folds it trims guesswork. Pair these tools with a stable stance and a reachable spray: moving your body, not just your wrist, keeps your cleaning angle consistent—especially across tall panes where technique tends to unravel at the top edge.
| Light Source | Recommended Angle | Pros | Cons |
|---|---|---|---|
| Overcast Daylight | Diffuse (any) | Even drying; low glare | Harder to spot micro-streaks without inspection pass |
| Afternoon Sun | Low/grazing | Reveals defects mercilessly | Speeds evaporation; increases smears |
| LED Torch | 15–30° rake | Pinpoints lines for targeted buffing | Time-consuming on large façades |
| Polarised View | N/A (filter) | Cuts glare; clarifies true residue | Less effective at dusk or indoors |
Clean in soft light; reveal faults with hard, angled light. That two-step rhythm is where streaks go to die.
Case Study: A Victorian Bay Window vs. Modern Bi-Folds
On a drizzly Tuesday in Manchester, I shadowed a veteran cleaner on a Victorian terrace with rippled glass bay windows, followed by a nearby new-build with six-panel bi-folds. The bay, wavy by design, magnified reflections and made conventional straight pulls unreliable. The pro adjusted to a steeper 40–45 degree squeegee lead and shortened the stroke, treating each ripple like a tiny camber. Under an LED inspection, he found three ghost arcs near the putty line—fixed with a sharp, horizontal feather pass.
At the bi-folds, the glass was flawless but the frames wicked water back onto the pane. Here, edge management mattered more than muscle. He pre-wiped gaskets, ran vertical pulls, then switched to a dry detailing cloth just for the outer 2 cm border. A quick cross-light scan with the late-afternoon sun revealed one faint diagonal; a microfiber corner—dry and tight—erased it in two seconds. The difference wasn’t the soap; it was the choreography of angle, light, and timing.
We tallied results: before light adjustment, 12 visible streaks across the two jobs; after deliberate inspection angles and squeegee tweaks, just one minor line remained—caught and corrected on the spot. It echoed what pros often report anecdotally across the UK: controlling light reveals the last 10% that separates “clean” from “pristine”.
Mastering the perfect angle for streak-free windows is less a hack than a habit: set your light, set your lead angle, and step to the side for that ruthless cross-light scan. The kit can be basic—a good rubber, a reliable microfiber, a bright torch—but the results look anything but. Clean under soft light, inspect under hard light, and finish with purpose along the edges. Which pane in your home will you test first—and what lighting trick will you try to expose the streaks you’ve been missing?
Did you like it?4.6/5 (29)